Festsaal
For staff and students:
Log in with your ZIH login.
You will automatically find a link to your home drive on the desktop.
Your locally saved data is only temporarily stored on the notebook and is automatically deleted.
For guests:
Please use the following login data to log in to the presentation notebooks:
Username: .\gastlogin
Password: Festsaal23
Your locally stored data will only be saved temporarily on the notebook and will be deleted automatically.
Notebook
For a presentation on location, it is best to use the notebook installed on the lectern, which has basic features for presentations (Office, PDF, browser, video).
If you want to connect your own notebook, use the HDMI cable of the installed notebook. At the end of your event, be sure to connect all cables as they were in the initial state.
Beamer
Turn on projectors A (left) and B (right) using the keypad, as needed. Make sure that the input on the connector panel is set to ASF 1 for both beamers.
Audio
The HDMI cable also transmits the audio from the notebook to the speakers in the banquet hall. Make sure that the Extron HDMI output is selected as the audio output on the notebook. This is the default for the installed notebook. If you use your own notebook, you usually have to make this setting yourself.
Keypad
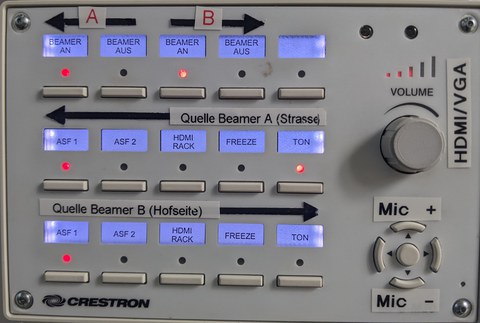
Beamer settings for attendance presentation
Notebook
- For hybrid events, it is best to use the notebook installed on the lectern, which has basic equipment for presentations (Office, PDF, browser, video) as well as for virtual conferences (zoom, additional DIenste via browser). Make sure that the four cables are connected to the notebook (HDMI, USB, LAN, power). Dial in to the used video conference.
- In order to see the virtual audience and their questions and reactions also in the fet hall, use the notebook installed at the rack (big black box in the left corner). Make sure that the HDMI cable and the power supply are connected. Turn on the notebook and dial into the used video conference on this device.
- If you want to connect your own notebook for the presentation, use the HDMI cable and the USB cable of the notebook installed on the lectern. Dial in to the used video conference. After finishing your event, be sure to connect all cables as you did in the initial state.
Beamer
Turn on projectors A (left) and B (right) using the keypad. Make sure that for one of the beamers the input on the keypad is set to ASF 1 for the other to HDMI Rack.
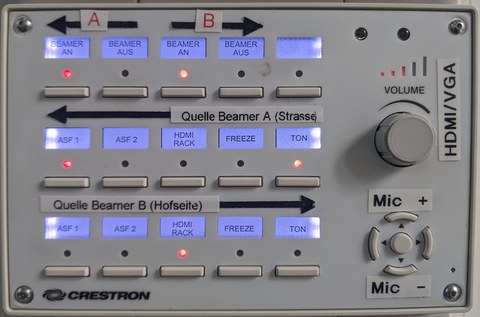
Beamer setup for hybrid events
Audio
The HDMI cable on the console also transmits the audio from the notebook to the speakers in the Festsaal. Make sure that the HDMI output Extron HDMI is selected as audio output on the notebook. This is the default for the installed notebook. If you use your own notebook, you usually have to make this setting yourself.
Microphone and video
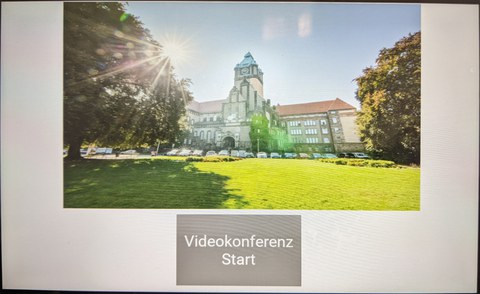
Touch panel to start a video conference
To be able to use the ceiling microphones installed in the Festsaal as well as the wide-angle camera, start the video conference via the touchpad above the keypad. The touchpad is turned on by tapping it once.
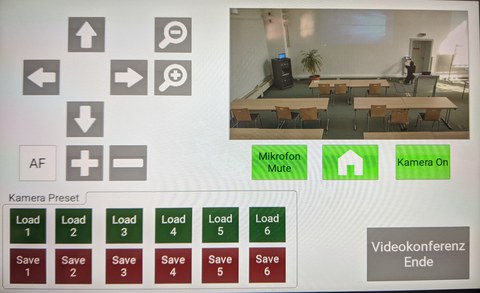
Setting options for camera and microphones
As initial setting the microphones and the camera are switched on (green boxes). Furthermore, a camera setting is made which can be used for the left part of the room. This can also be selected manually via the "Home" button. Further templates can be loaded via the Load buttons. Manual adjustment of the camera is also possible (arrow keys, magnifying glass for zoom, AF for auto focus). Please note that the camera display on the touch screen only serves as a preview and is therefore displayed with a delay.
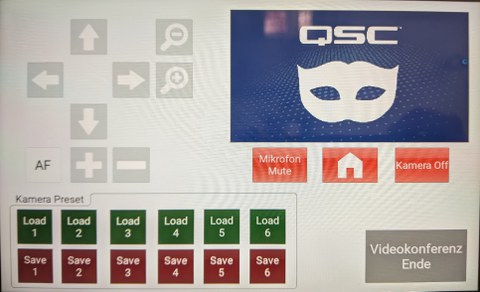
Deaktivieren von Mikrofon und Kamera
If you want to mute the microphones and/or turn off the camera during a hybrid event, you can do so via clicking the microphone and/or camera button. If both buttons are red, the microphones and the camera are disabled.
Video conferencing tool settings
Start the video conferencing tool of your choice and make sure that the correct settings for audio output (Extron HDMI), audio input (Echo Cancalling Speakerphone - Core-Tillich-Bau) and camera (Core-Tillich-Bau) are set. Share your screen in the chosen video conferencing tool and start your event.
