Didactic reduction
Didactic reduction always takes place when extensive and complex facts are prepared in order to make them manageable and comprehensible for the learners." (Lehner 2012, p.9)
- Objective: A set of material is turned into a set of learning material through simplification and shortening in a targeted manner and for didactic reasons.
-
It follows from this: Didactic reduction is one of the core tasks when preparing your teaching.
How does didactic reduction work?
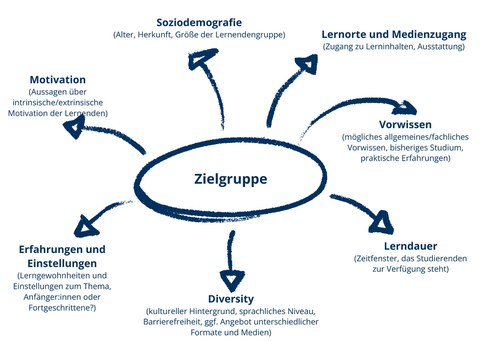
1. target group analysis
To determine the learning quantity, it is advisable to analyze your learning group on the basis of various criteria.
2. the twelve steps of didactic reduction
- Target group analysis
- Self-analysis of the teacher (What expertise do I have?)
- Definition of learning objectives & time frame
- Context and terminology: What can be assumed?
- Delimit & thin out the topic
- Compile content: What individual content makes up a topic?
- Bundle content: What can be summarized?
- Create a learning map
- Visualizing the map: How can a topic area be clearly visualized?
- Create "islands": How detailed does the visualization need to be?
- Designing subordinate maps for individual content
- Developing a prototype: What can a qualitative reduction (reduction in difficulty) look like?
(see Ritter Mamczek 2011)
3. methods for didactic reduction
There is no "one" right way to didactic reduction, your approach depends on the respective subject and subject interest. However, some methods are universally applicable.
The examples of methods listed here differentiate between reducing the amount of material, reducing the complexity of the content and reduction as a learning activity.
Reducing the amount of material
Reduction screens
Purpose: Select content according to time
Idea: Stones of different grain sizes can be separated using sieves of different fineness. Almost everything falls through a coarse sieve, whereas a fine sieve holds back the majority of the stones. This idea can be applied to content with different time budgets.
Procedure: First determine the grain size of your sieves. As a rule of thumb:
- The finest sieve corresponds to the usual total duration of your course or teaching unit, e.g. two days.
- The middle sieve is much coarser, e.g. one hour.
- The last sieve only holds the essential content, e.g. content for a short 15-minute lecture. When sifting, it is advisable to start with the coarsest sieve first, as it is often easier to select a few central contents than to laboriously "sort out" some of the many contents.
(Lehner 2020, p. 180)
Purpose: To provide a rough subject-specific orientation
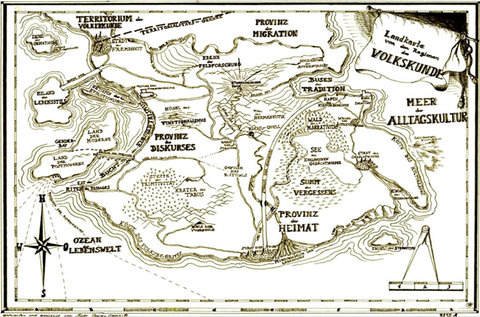
Idea: Subject maps are structural aids at course level (= "route planner for courses"). They help to make the basic subject-specific landscape visible by providing an overview and structural knowledge, e.g. in the form of conceptual networks.
Procedure: Determine the individual elements of your subject map, e.g.
- Structures, e.g. the "big picture" and the specialist areas;
- Arrangement, e.g. in biology according to habitats or according to the system of plants and animals.
Orientation knowledge is best provided at the beginning of a course so that it can be referred to again and again.
(Lehner 2020, p. 178)
Further information can be found on the website of the University of Hagen.

Example of a subject map for European ethnology
Reducing the complexity of the content
Purpose: Orientation through a learning aid provided in advance
Idea: An expert structure provided early on in the learning process helps learners to find their way around the content. In addition, learning interest is stimulated, existing knowledge is linked with new knowledge and learners' attention is directed.
Procedure: Create a slide or worksheet with some of these elements:
- Approx. 15 relevant terms, questions or ideas;
- Notes on important connections;
- Visualization of selected aspects.
The teacher presents the "Advance Organizer" in max. 15 minutes.
(Lehner 2020, S. 181)
Reduction as a learning activity
Purpose: To explain key content in just a few minutes
Idea: The elevator pitch (also: elevator speech) is originally an "elevator presentation" with the aim of presenting a service or product. Transferred to teaching, it is an invitation to learners to present content in a concentrated form.
Procedure: Make the learners aware of the time frame of the presentation (e.g. three minutes). Helpful elements of an elevator pitch are, for example
- Pictures and comparisons,
- Examples,
- Appropriate reduction.
(Lehner 2020, p. 186)

