Wiederherstellen mit dem Grafischen Werkzeug
Inhaltsverzeichnis
Aufruf des graphischen Wiederherstellungs-Werkzeugs
Sie müssen wie nachfolgend beschrieben zuerst die graphische TSM-Oberfläche (GUI) aufrufen.
| Windows |
|---|
| wie unter "Konfiguration -> Windows" beschrieben durch Auswahl im Windows-Start-Menü oder |
|
indem Sie ein administratives Eingabe-Aufforderungs-Fenster (cmd) unter Windows öffnen und folgende Kommandos absetzen: C:> cd C:\Program Files\Tivoli\TSM\baclient C:\Program Files\Tivoli\TSM\baclient> dsm.exe |
|
Linux root@myPC~$ dsmj |
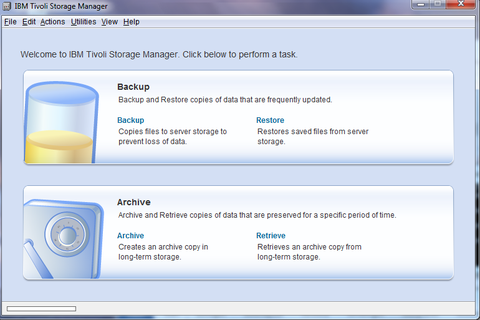
In der jetzt geöffneten graphischen Oberfläche von TSM (siehe nachfolgendes Bild) wird dann das graphische Wiederherstellungswerkzeug aufgerufen, indem Sie auf das "Restore" in blauer Schrift in der oberen Hälfte rechts klicken.
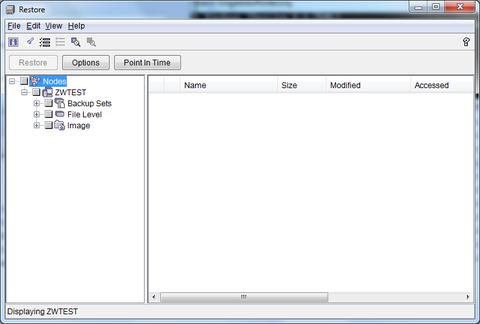
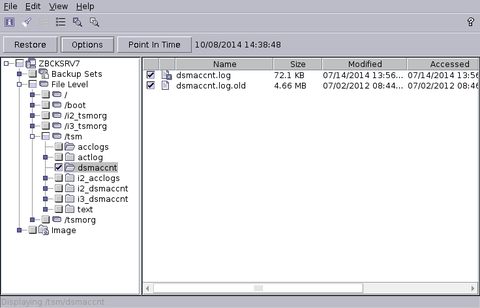
Daraufhin öffnet sich das grafische Wiederherstellungswerkzeug.
Das ist Voraussetzung für alle nachfolgenden Wiederherstellungs-Beispiele.
Beispiele für die Wiederherstellung von Daten
Sie benötigen die unter "Wiederherstellen von Daten" beschriebenen Voraussetzungen.
- 1.) Wiederherstellen einer einzelnen Datei aus dem letzten, aktuellsten Backup in ein anderes Verzeichnis
- 2.) Wiederherstellen von Daten älteren Datums in das Ursprungsverzeichnis
- 3. ) Wiederherstellen eines Verzeichnisses, wie es zu einem bestimmten Zeitpunkt war
- 4.) Wiederherstellen von Daten auf einem anderen Rechner
Für alle nachfolgenden Beispiele wird das geöffnete graphische Wiederherstellungs-Werkzeug vorausgesetzt.
1.) Wiederherstellen einer einzelnen Datei aus dem letzten, aktuellsten Backup in ein anderes Verzeichnis
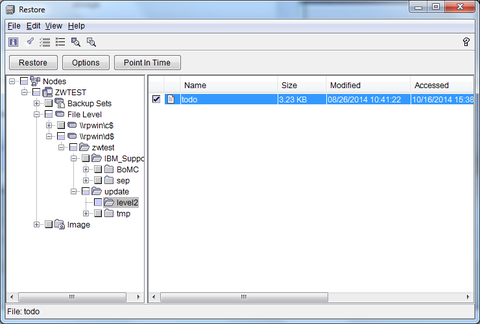
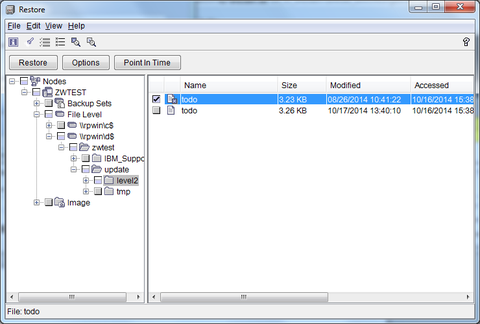
Durch Klicken auf das "+"-Zeichen vor "File Level" öffnen sich weitere Ordnerebenen, die man wiederum mit einem Klick auf das "+"-Zeichen davor öffnen kann. Schließlich wird der Inhalt des Ordners \\rpwin\d$\zwtest\update\level2 angezeigt, in dem man auf "level2" doppelt klickt. Damit erscheint auf der rechten Seite der Inhalt des Ordners und man kann die Datei "todo" durch einfaches Anklicken auswählen. Nach der Auswahl klickt man auf den Button "Restore".
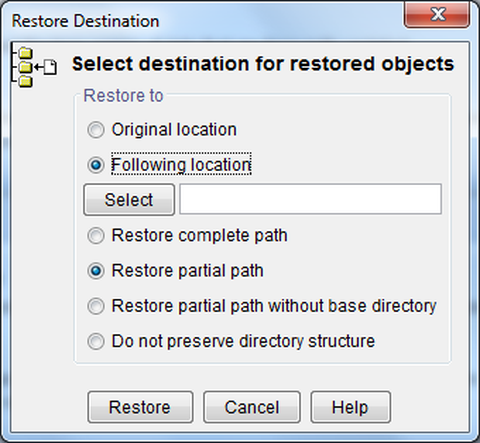
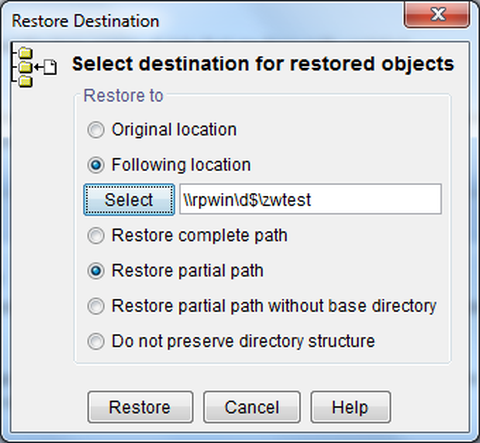
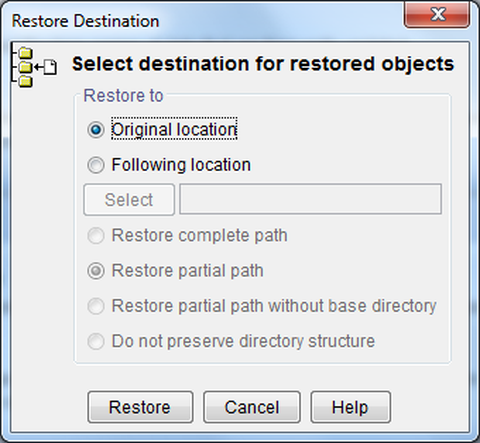
Anschließend wird abgefragt, in welchen Ordner restauriert werden soll. Man kann den Zielordner direkt eingeben. Klickt man auf select, kann man graphisch auswählen.
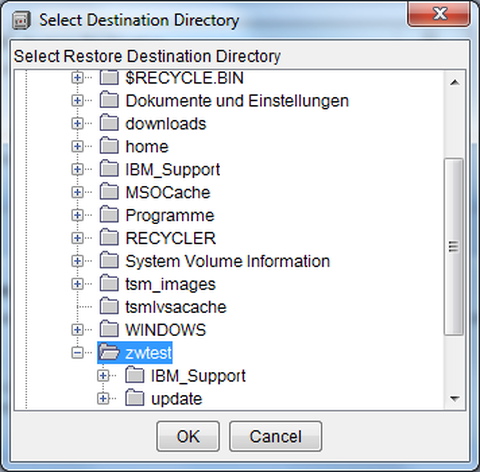
Nachfolgend wird auf grafischem Wege der Zielordner "\\rpwin\d$\zwtest\" ausgewählt, bestätigt wird die Auswahl mit "ok".
Im "Zielordner-Auswahlfenster" erscheint nun der ausgewählte Ordner und man setzt mit Klick auf den Restore-Button die Wiederherstellung fort.
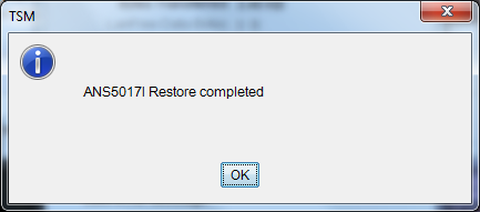
Der Restore-Prozess kann unterschiedlich lange dauern. Bei erfolgreichem Abschluss des Restore-Vorganges sollte Sie eine solche Mitteilung bekommen. Die können Sie mit ok schließen.
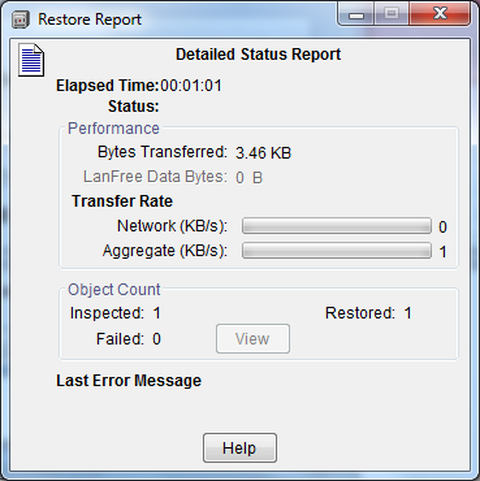
Außerdem bekommen Sie einen Report darüber, wieviele Dateien in welcher Zeit mit welchen Fehlern restauriert werden konnten. Diesen Report schließen Sie mit Klick auf das rot hinterlegte Kreuz rechts oben in der Ecke.
Im Verzeichnis "\\rpwin\d$\zwtest\" befindet sich nun die restaurierte Datei "todo".
2.) Wiederherstellen von Daten älteren Datums in das Ursprungsverzeichnis
Benutzen Sie den Reiter "View" in der obersten Zeile. Unter dem Reiter "View" klicken Sie dann "Display active/inactive files" an. Anschließend wählen Sie Ihre zu restaurierenden Dateien aus. In der gleichen Auswahl wie unter Punkt 2 sehen Sie jetzt auf der rechten Seite zwei mögliche auswählbare Dateien, wovon die eine als "inaktiv" markiert ist. Das bedeutet, dass diese auf Ihrer Platte entweder gelöscht oder durch eine neue Version ersetzt wurde. Im nachfolgenden Beispiel wurde die inaktive Datei mit Modifikations-Datum 26.August 2014 ausgewählt. Anschließend setzt man mit "Restore" fort.
Diesmal soll die Datei in den Original-Ordner restauriert werden, also in " \\rpwin\d$\zwtest\update\level2". Es wird also "original location" ausgewählt.
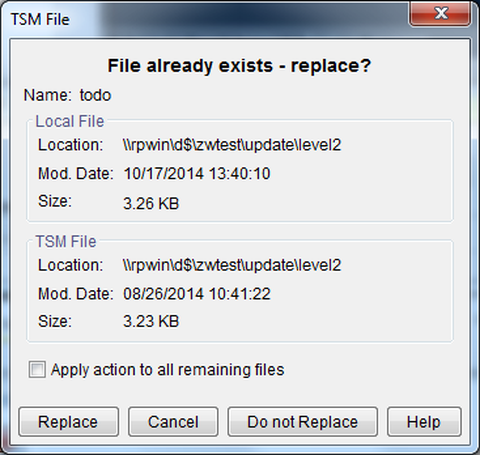
Die Datei "todo" im Verzeichnis existiert aber bereits. Deshalb erscheint die Abfrage, wie weiter zu verfahren ist.
Wenn Sie die neuere Datei "todo" auf Ihrer Platte überschreiben wollen mit der wiederherzustellenden aus dem Backup klicken Sie auf "Replace". Das weitere Vorgehen ist dann wie bei Punkt 2.
3. ) Wiederherstellen eines Verzeichnisses, wie es zu einem bestimmten Zeitpunkt war
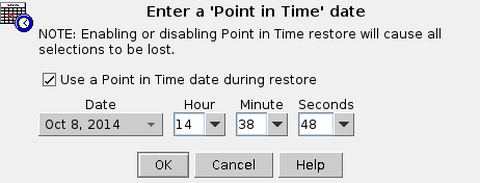
Im graphischen Wiederherstellungswerkzeug klicken Sie auf "point in time". Dort können Sie eine Auswahl des Zeitpunktes vornehmen, an dem Sie z.B. Ihre Daten noch intakt vermuten und den Stand restaurieren möchten. Anschließend setzen Sie mit "ok" fort.
Danach können Sie noch die Auswahl an Ordnern oder Einzelfiles treffen, die Sie restaurieren möchten. Es erfolgt das Aufklappen der Ordner durch Klick auf das kleine blaue Kästchen vor dem Ordnernamen in der linken Spalte. Hier soll das ganze Verzeichnis "/tsm/dsmaccnt" restauriert werden. Die Auswahl erfolgt durch Klick auf das etwas größere grau hinterlegte Kästchen vor dem Ordnernamen in der linken Spalte. Anschließendes Klicken auf "Restore" setzt den Wiederherstellungsvorgang mit der getroffenen Auswahl fort.
Sie werden anschließend wieder befragt, in welchen Zielordner die Daten restauriert werden sollen. Die Auswahl treffen Sie wie unter Punkt 2 bzw. Punkt 3 beschrieben.
4.) Wiederherstellen von Daten auf einem anderen Rechner
Falls Ihr Rechner sich mit einem nicht behebbaren Fehler verabschiedet hat, kann es notwendig sein, die Daten auf einem anderen Rechner zu restaurieren, auf dem möglicherweise schon eine TSM-Sicherung unter einem anderen Nodenamen erfolgt.
Voraussetzungen sind: Der Zielrechner hat das gleiche Betriebssystem wie der Originalrechner, es sollte ungefähr die gleiche TSM-Version installiert sein, ein Filesystem kompatibel zum Originalfilesystem sollte verfügbar ein, darin ausreichend Platz für die zu restaurierenden Daten, Sie haben das Klienten-Password und falls die Daten verschlüsselt wurden auch das Verschlüsselungspassword, was dem ZIH nicht bekannt ist und nicht umgangen werden kann.
| Windows |
|---|
|
Legen Sie eine Datei im Pfad C:\Programme\Tivoli\TSM\baclient an. Dateiname z.B. dsm_restore_old.opt Inhalt dieser Datei sind die TSM-Konfigurationsdaten Ihres defekten Rechners. |
|
Öffnen Sie ein administratives Eingabefenster (cmd) und setzen Sie folgende Kommandos ab: C:> cd C:\Program Files\Tivoli\TSM\baclient C:\Program Files\Tivoli\TSM\baclient> dsm.exe -optfile=dsm_restore_old.opt |
| Das weitere Vorgehen ist dann wie unter Punkt 1-3 beschrieben. |
| Linux |
|---|
|
|
Anschließend erfolgt der Aufruf root@myPC~$ dsmj -optfile=/opt/tivoli/tsm/client/ba/bin/dsm_restore_old.opt |
| Das weitere Vorgehen ist dann wie unter Punkt 1-3 beschrieben. |

