Konfiguration unter Windows
Inhaltsverzeichnis
Oben genannte Schritte sind in der angegebenen Reihenfolge durchzuführen
1.) Klientenspezifische Konfiguration
Nachfolgend wird die Konfiguration mit Hilfe der graphischen Oberfläche beschrieben. Die Konfigurationsdaten werden bei Windows standardmäßig nur in die Datei C:\Programme\Tivoli\TSM\baclient\dsm.opt geschrieben. Eine Datei dsm.sys (wie bei Linux) gibt es nicht.
Bitte arbeiten Sie auch für die Konfiguration bei allen Schritten als Administrator.
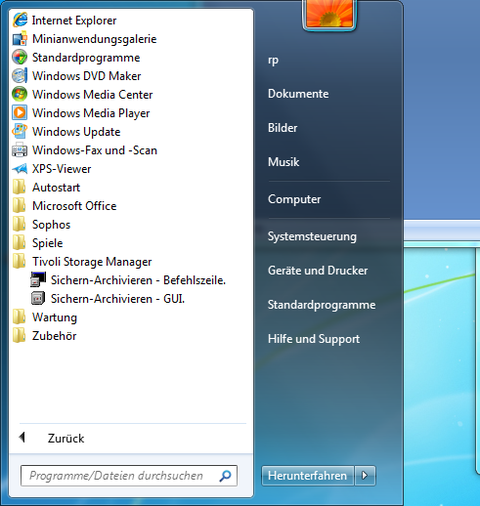
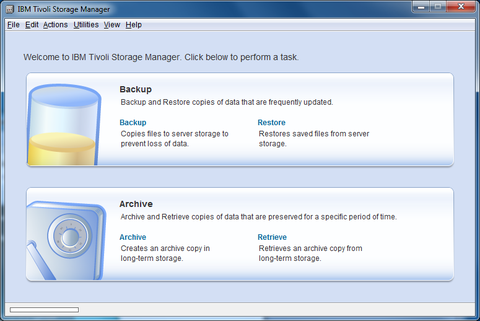
Zuerst müssen Sie die grafische Oberfläche aufrufen.Diese befindet sich standardmäßig in dem Ordner "Tivoli Storage Manager" unter dem Namen "Sichern-Archivieren - GUI". s. BIld
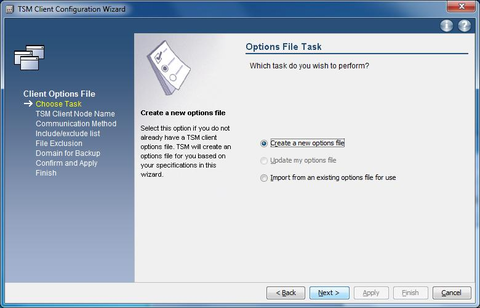
Beim ersten Aufruf der grafischen Backup-Oberfläche erscheint wie nachfolgend beschrieben zunächst ein Assistent, welcher Ihnen helfen soll, eine Konfigurationsdatei zu erstellen. Wählen Sie den Punkt "Create a new options file" aus und klicken Sie anschließend auf "Next >"
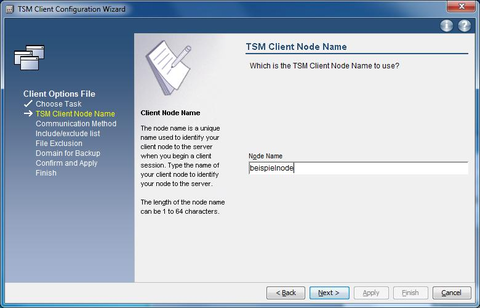
Nun müssen Sie Ihren vom ZIH erhaltenen Knotennamen eintragen. Anschließend klicken Sie bitte auf "Next >".
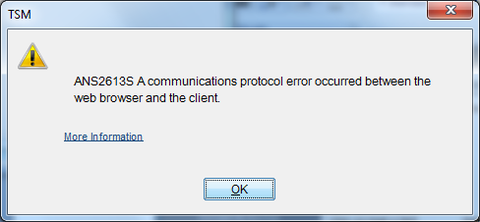
Unter manchen Windowssystemen erscheint nachfolgende Fehlermeldung. Diese kann ignoriert werden und wird mit einem Klick auf "OK" geschlossen.
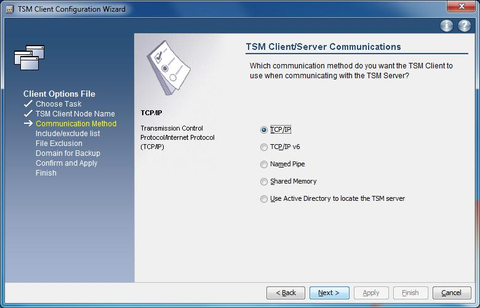
Die Art der Kommunikation mit dem Backupserver wird in unserem Anwendungsfall immer mit "TCP/IP" festgelegt. Klicken Sie nach dieser Auswahl auf "Next >".
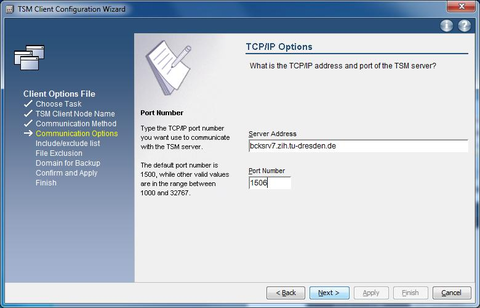
Sie benötigen anschließend sowohl die Serveradresse als auch die Port-Nummer um fortzufahren. Beides haben Sie vom ZIH erhalten (tcpport und tcpserveraddress) Klicken Sie nach der Eingabe auf "Next >".
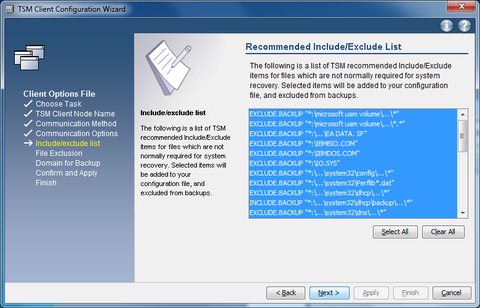
Nun haben Sie die Möglichkeit, bestimmte (vordefinierte) Pfade aus dem späteren Backup auszuschließen. Sie können alle nicht im Backup gewünschten Pfade auswählen (so wie im Beispiel) Klicken Sie anschließend auf "Next >".
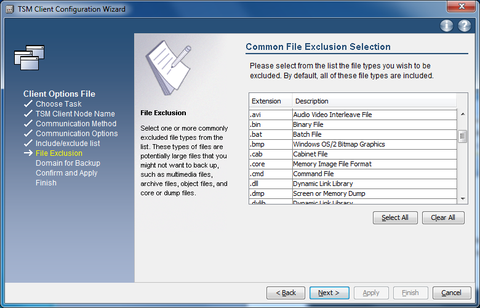
Nachfolgend können Sie entscheiden, welche Dateitypen nicht in das Backup übernommen werden sollen. Die Markierung erfolgt, wie unter Windows üblich, entweder einzeln durch einfaches Anklicken, unter Zuhilfenahme der Shift-Taste (für Auswahl mehrerer hintereinander liegender Optionen) oder der STRG-Taste (für Auswahl mehrerer Optionen, die nicht hintereinander aufgelistet sind). Klicken Sie (ggf. nach der Auswahl) auf "Next >".
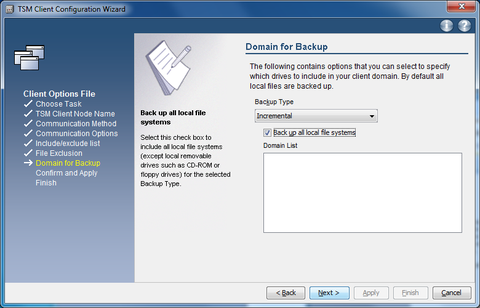
Sie sollten bei der nachfolgenden Auswahl der Domains den Backup-Typ auf "Incremental" setzen. Außerdem können Sie entweder durch ein Häkchen auf "Back up all local file systems" alle lokalen Partitionen für die Sicherung vorsehen oder die für Sie notwendigen einzeln auswählen.
Sollte sich hier kein Filesystem auswählen lassen, wird das zu späterer Zeit nachgeholt. Fahren Sie mit einem Klick auf "Next >" fort.
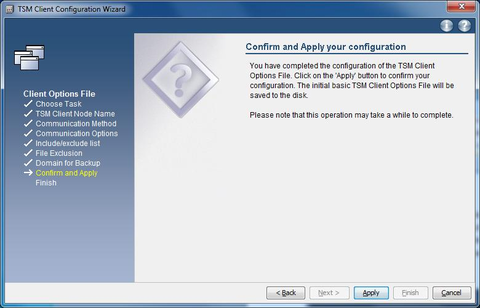
Mit einem Klick auf "Apply" wird nachfolgend bestätigt, dass diese bisherige Konfiguration wirksam werden soll.
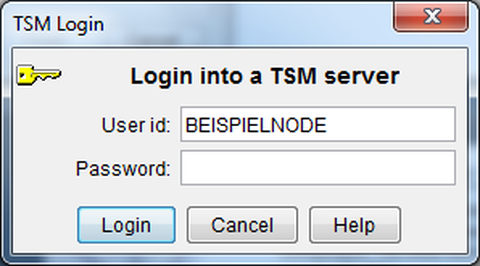
Im Anschluss werden Sie aufgefordert, sich mit Ihrem Knotennamen (hier als USER ID abgefragt) und dem dazugehörigen Passwort beim Backupserver anzumelden. Nach Eingabe der abgefragten Daten (beides haben Sie vom ZIH bekommen) klicken Sie bitte auf "Login".
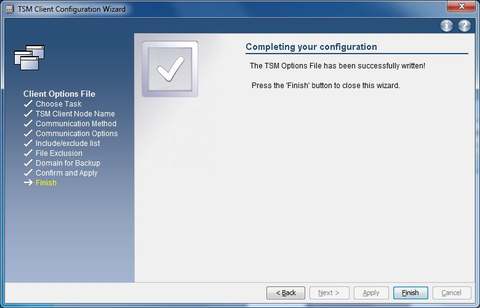
Klicken Sie im Anschluss auf "Finish" um die Datei dsm.opt zu erstellen und den Assistenten und die graphische Oberfläche zu schließen.
Es müssen nun noch einige zusätzliche Einstellungen geprüft/vorgenommen werden. Bitte rufen Sie dazu wieder die grafische Oberfläche auf, in dem Sie den Ordner "Tivoli Storage Manager" öffnen und das "Sichern-Archivieren - GUI."-Programm ausführen (ggf. wird die Passworteingabe für Ihren Knoten gefordert).
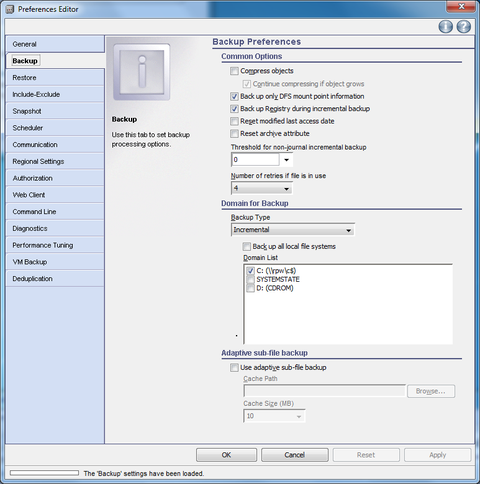
Nach dem Aufruf der grafische Oberfläche klicken Sie bitte in der oberen Leiste auf "Edit" und wählen den Punkt "Client Preferences" aus.
Anschließend öffnet sich ein weiteres Fenster. Der Reiter "General" ist hier standardmäßig beim Aufruf ausgewählt. Hier sollten Sie sich den Ordner, in dem sich die "Error Log"-Datei befindet, merken oder ggf. ändern, denn diese Datei enthält alle Fehler, die während eines Backups aufgetreten sind. Sie können außerdem einstellen, wie lange diese Datei bestimmte Fehler speichern soll. Klicken Sie noch nicht auf "Apply", wenn Sie Änderungen vorgenommen haben, "ok" reicht, sonst müssen Sie für jede Änderung von Konfigurationsdaten den Assistenten neu aufrufen.
Hinweis: Es wird empfohlen ein Häkchen auf "Prune old entries" zu setzten. Dies aktiviert die Automatische Löschung der festgehaltenen Fehler, die älter als die angegebene Anzahl von Tagen sind.
Unter dem Reiter "Backup" haben Sie die Möglichkeit, bestimmte Domains (im TSM sind das Partitionen bzw. Filesysteme) ins Backup ein- oder auszuschließen. Diese Einstellungen können Sie unter dem Punkt "Domain for Backup" vornehmen. Sollten Sie Änderungen getätigt haben, klicken Sie bitte anschließend auf "ok".
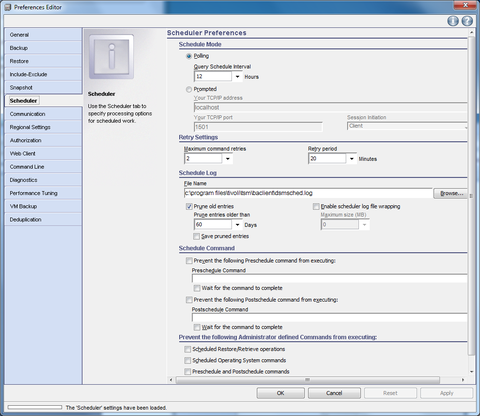
Unter dem Reiter "Scheduler" haben Sie die Möglichkeit die "Scheduler Log"-Datei zu verwalten (ähnlich wie "Error Log"). In dieser werden alle relevanten Informationen des automatischen Backups gespeichert. Klicken Sie danach auf "ok"
Hinweis: Es wir auch hier empfohlen ein Häkchen bei "Prune old entries" zu setzen, da diese Datei u.U. recht groß werden kann.
Zuletzt sollten Sie noch unter dem Reiter "Authorization" den Punkt "Password Generate" anklicken. Dadurch wird Ihr Passwort nach dem nächsten Anmeldevorgang am Backupserver in verschlüsselter Form lokal bei Ihnen gespeichert. Nach diesen Einstellungen müssen Sie mit "Apply" alle Einträge abspeichern.
Damit das Password nach dieser Einstellung wirklich lokal abgespeichert wird, müssen Sie die graphische Oberfläche noch einmal schließen und neu öffnen. Sie müssen Ihr Password eingeben. Nach dem Verlassen der graphischen Oberfläche und erneutem Aufruf derselben sollte diese sich jetzt ohne Passwortabfrage öffnen. Das ist Voraussetzung für die Konfiguration des automatischen Backups.
2.) Einrichten des automatischen Backups
Es wird vorausgesetzt, dass sich die graphische Oberfläche ohne Passworteingabe öffnen lässt. (siehe maschinenspezifische Konfiguration letztes Bild/ letzter Text).
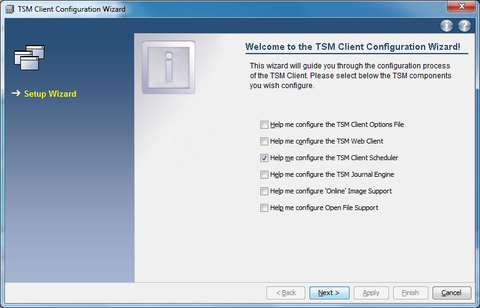
Bitte öffnen Sie wieder die graphische Oberfläche. Klicken Sie anschließend in der oberen Menüleiste auf den Punkt "Utilities" und anschließend auf das unterste Feld "Setup Wizard" (oder "Setup Assistent"))
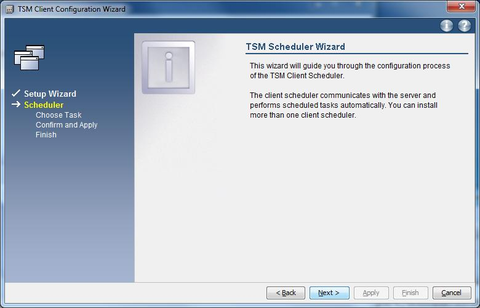
Im sich anschließend öffnenden Fenster (siehe nachfolgendes BIld) wird die Option "Help me configure the TSM Client Scheduler" angekreuzt. Klicken Sie anschließend auf "Next >"
Hinweis: Bei der Einrichtung des automatischen Backups nur diese eine Option ankreuzen.
Klicken Sie bei nachfolgender Meldung auf "Next >".
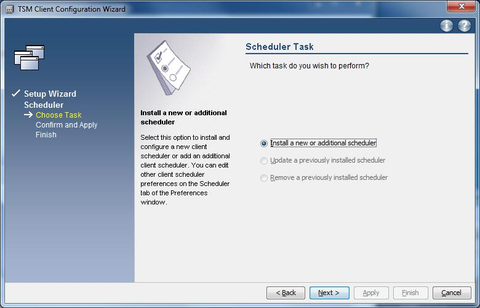
Wählen Sie nachfolgend den ersten Punkt, "Install a new or additional scheduler", und klicken anschließend auf "Next >".
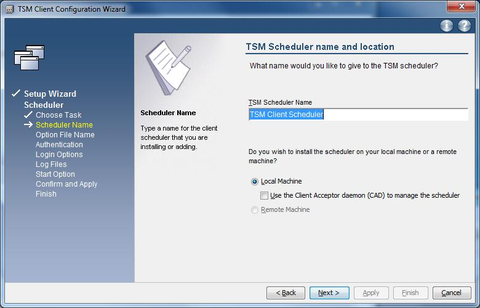
Nachfolgendend können Sie den Namen des Prozesses, wie er dann im System unter Windows-Dienste erscheint, eintragen. Dieser Dienst muss dann später immer gestartet sein, um das automatisierte Backup auszuführen und zu überwachen. Klicken Sie danach auf "Next >"
Hinweis: Es wird empfohlen, den Standardnamen "TSM Client Scheduler" beizubehalten. Bitte verwenden Sie nicht den Client Acceptor Daemon.
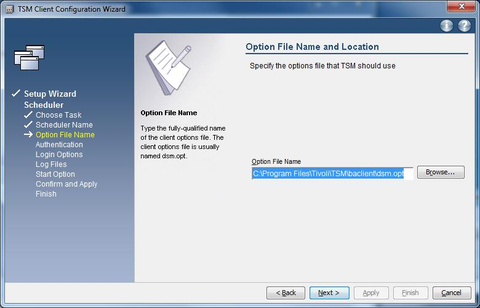
Die unter "Maschinenspezifische Konfiguration" erstellte dsm.opt-Datei muss im nächsten Schritt mit dem vollständigen Pfad angegeben werden, falls dies nicht schon automatisch vorgegeben wird. Anschließend klicken Sie bitte auf "Next >".
Geben Sie nachfolgend Ihren Knotennamen (falls dieser nicht schon automatisch eingefügt wird) und das dazugehörige Passwort ein. Das Häkchen bei "Contact the TSM Server to validate password" sollte gesetzt sein. Klicken Sie anschließend auf "Next >".
Klicken Sie nachfolgend auf die Punkte "The System account" und "Automatically when Windows boots", falls diese nicht voreingestellt sind. Anschließend klicken Sie bitte auf "Next >".
Hinweis: Beim Sichern von remote Shares die z.B. von einem NAS-Filer verwaltet werden, kann es notwendig sein, einen anderen account, der über die notwendigen Rechte verfügt, anzugeben.
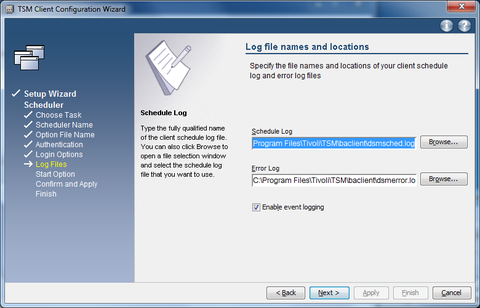
Die nachfolgend bereits vordefinierten Pfade des "Error Logs" und "Schedule Logs" sollten übernommen werden. Klicken Sie bitte auf "Next >"
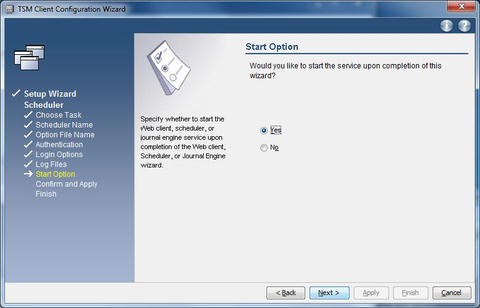
Nachfolgend kann "Yes" angekreuzt werden, um den Dienst gleich zu starten. klicken Sie anschließend auf "Next >".
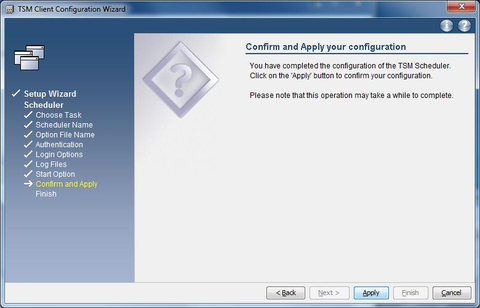
Die Konfiguration des automatischen Backups wird abgeschlossen, indem Sie nachfolgend auf "Apply" klicken (Der nun folgende Vorgang kann einige Sekunden dauern).
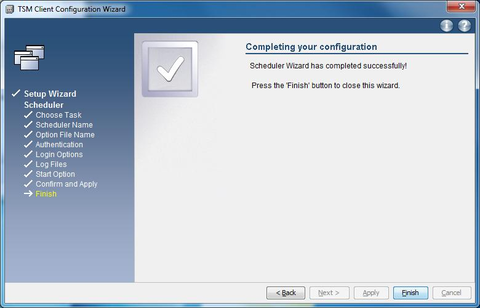
Schließen Sie nun abschließend den Assistenten, indem Sie auf "Finish" klicken.
3.) Überprüfen der Konfiguration
- Sie können überprüfen, ob der automatische Backupdienst gestartet ist, indem Sie sich die Windows-Dienste anzeigen lassen. (z.B. bei Windows 7 über den Windows-Taskmanager, dort "Dienste" öffnen). Dort sollte sich der "TSM Client Scheduler" im Status "wird ausgeführt" befinden.
- Besonders nach den ersten Sicherungen sollten Sie überprüfen, dass es keine Fehler gab. Sie erhalten als Administrator eines Backup-Klienten, der eine automatische Sicherung durchführt, täglich eine Statusmail vom Backup-Service. Den Status erkennen Sie bereits im Subject der Mail. Alles andere als "Completed" bedarf einer genaueren Überprüfung. In der Statusmail bekommen Sie auch angezeigt, welche Datenmenge sich von Ihrem Klienten im Backup befindet. Prüfen Sie, ob diese Ihren Erwartungen ungefähr entspricht.
- Geeignete Werkzeuge zur Fehlersuche oder zum Überprüfen, ob das Backup funktioniert hat, wie es sollte, sind die beiden Logfiles dsmerror.log und dsmsched.log, die sich standardmäßig im Ordner C:\Programme\Tivoli\tsm\baclient befinden. Bitte wenden Sie sich mit Einträgen, die auf unerklärliche Fehler hindeuten an den servicedesk.
- Sie können Ihre klientenspezifische Konfigurationsdatei dsm.opt auch mit einem einfachen Editor wie z.B. Wordpad bearbeiten (bitte nicht mit MS Office Word o.ä.). Nach jeder Änderung muss der Dienst "TSM Client Scheduler" gestoppt und neu gestartet werden, da ansonsten die geänderten Konfig-Daten keine Berücksichtigung finden. Nachfolgend ist eine Beispiel-Konfigurationsdatei abgebildet.
|
Windows: Beispiel einer dsm.opt Datei COMMMethod TCPip TCPPort 1234 TCPServeraddress bxx.zih.tu-dresden.de passwordaccess generate schedlogname C:\Programme\tivoli\tsm\baclient\dsmsched.log schedlogretention 50 d errorlogname C:\Programme\tivoli\tsm\baclient\dsmerror.log errorlogretention 50 d domain C: D: INCLUDE "D:\...\Users\...\*" INCLUDE.BACKUP "*:\...\files_to_backup\...\* EXCLUDE.DIR "*:\...\Temporary Internet Files" EXCLUDE.DIR "C:\recycled" |
Genauere Hinweise zur Bedeutung der einzelnen Anweisungen/Zeilen in dieser Datei erhalten Sie unter Konfigurations-Details. Eine komplette Angabe aller möglichen Anweisungen finden Sie unter -> FAQ's/Dokumentation -> IBM-Dokumentation -> Installationsanleitungen.

